
A Better Apple Pie?

Fall is here, which means I am 100% embracing apples. I am all in, people. All in.
Apple crisp. Apples in my oatmeal. Applesauce. Apples sliced and dunked in nut butter. And my new favorite, Apple Slab Pie.
Slab pie? How could Apple Slab Pie possibly be better than the classic apple pie many of us know and love?
I present the following arguments:
Apple Slab Pie serves more people. If you’re a veteran pie cutter, you know that it is truly difficult to get more than 10 slices out of a traditional 9 inch round pie. Especially, counterintuitively, if it’s a deep dish pie. Trying to cut a heapingly tall pie into smallish servings leads to slices that lack the structure to hold together. Still yummy, true, but you did not go through the trouble of fluting a pie crust in order for it to fall apart in a heap on the plate, right?
Right.
A slab pie, on the other hand, serves at least 16. The larger surface area of a 9” x 13” pan means that the filling isn’t piled up quite so high. This way, smaller servings DO have the structure to hold together. The ability to cut your slab pie into rectangular or square pieces also helps stretch out the servings. People with dainty appetites can much more easily cut a rectangular serving in half with one fell swoop of the knife rather than trying to cut a tiny sliver of traditional pie. Who these dainty eaters are, I don’t know, but I’d like them to have some teeny tiny servings of pie if that’s what they’d like.
Apple Slab Pie is easier to make. There’s something about baking a traditional pie that often feels intimidating to people. Will the crust slip down into the pan? Will it look picture perfect once it comes out of the oven? And speaking of fluting a crust, how do you actually do that?
The pressure is off with a slab pie. Seriously, the word “slab” is in the name. SLAB. No one pictures a pie with precious leaf cutouts or elegant chevron lattice work when hearing “slab pie.” What’s pictured is something homey and rustic. Maybe some lumps and bumps in the crust, maybe some holes where the filling oozed out. Nothing fancy.
There’s still crust rolling required with a slab pie, but it feels much more casual. Roll the bottom crust an inch or two bigger than the dimensions of your pan, roll the top crust out to the dimensions of the pan. Check the sizes of both by just laying them in your pan. Boom. Rolling done.
And once your bottom crust is filled, lay your top crust on top and fold together the edges. Clumsily, if that’s what you’ve got in you. It really doesn’t matter. Because, remember: SLAB.
Apple Slab Pie provides an opportunity for frosting. BROWNED BUTTER FROSTING. You can absolutely serve your Apple Slab Pie without any glaze or drizzle. It will still look lovely and homey and will taste delicious. But if you’re like me, if you enjoy eating frosting from the spoon, if you are always angling to get the corner piece of cake, if you think donuts should be glazed AND frosted, then the idea of combining pie crust plus frosting is mind-blowing.
Also, did you read what I wrote in all caps up there? This is browned butter frosting. Browned butter is magic! The amount of glaze you drizzle on top of your slab pie is totally up to you. So if you want a little frosting, drizzle just a bit! If you’re a frosting fiend, baby, pour that magic stuff on. I drizzled conservatively when first making these, then added some more to the leftovers the next day.
Now, don’t get me wrong. I’ll still be making my very favorite Crumb Top Bourbon Apple Pie this fall.
But when it comes to dessert options, I tend to think less is not more. More is more is more is more. More deliciousness.


I was first introduced to the concept of a slab pie by this very delicious, very whimsical Giant Strawberry Pop Tart. It never fails to delight people. Recently, I needed to make a crowd-sized dessert. I also had an entire bucket of apples in my kitchen. Could I make a Giant Apple Pop Tart? I decided to play around with my favorite pie recipe and find out. What I ended up with wasn’t what I’d call a Pop Tart. There are entirely too many apples in the filling to be quite that flat. In fact, I increased the amount of apples from my usual apple pie recipe to make sure the filling would fit adequately in the pan. If you’d like a flatter slab pie, feel free to decrease the apples a bit. Even with the extra apples, this slab pie was sturdy enough to be eaten by hand or with a fork.
Note that this recipe calls for two pie crusts. If making them from scratch, I found it worked well to use a recipe that produces two crusts and to divide the pie dough a bit unevenly into two portions before refrigerating. Use the slightly bigger portion for your bottom crust and the slightly smaller portion for the top crust. I haven’t tried this with pre-made crusts, but I imagine it would work just fine to tear a bit off of one and roll it into the other crust to produce two differently sized crusts. You could also not be quite so picky and not do this different size business and just roll your crusts out to the right dimensions. I did say this was supposed to be easier than a traditional pie, after all.
Apple Slab Pie
Ingredients:
2 prepared pie crusts (This is my favorite recipe)
Filling:
1/3 cup granulated sugar
1/4 cup all purpose flour
1/2 teaspoon ground cinnamon
1/4 teaspoon salt
About 3-1/2 pounds apples of your choice (I often use Granny Smith, but a mix of apples is great too)
2 tablespoons bourbon
Browned Butter Glaze:
1 cup powdered sugar
4 tablespoons unsalted butter
1-1/2 tablespoons water
Directions:
Preheat oven to 375 degrees and adjust oven rack to middle of oven. Cover a large rimmed baking sheet with foil and set aside.
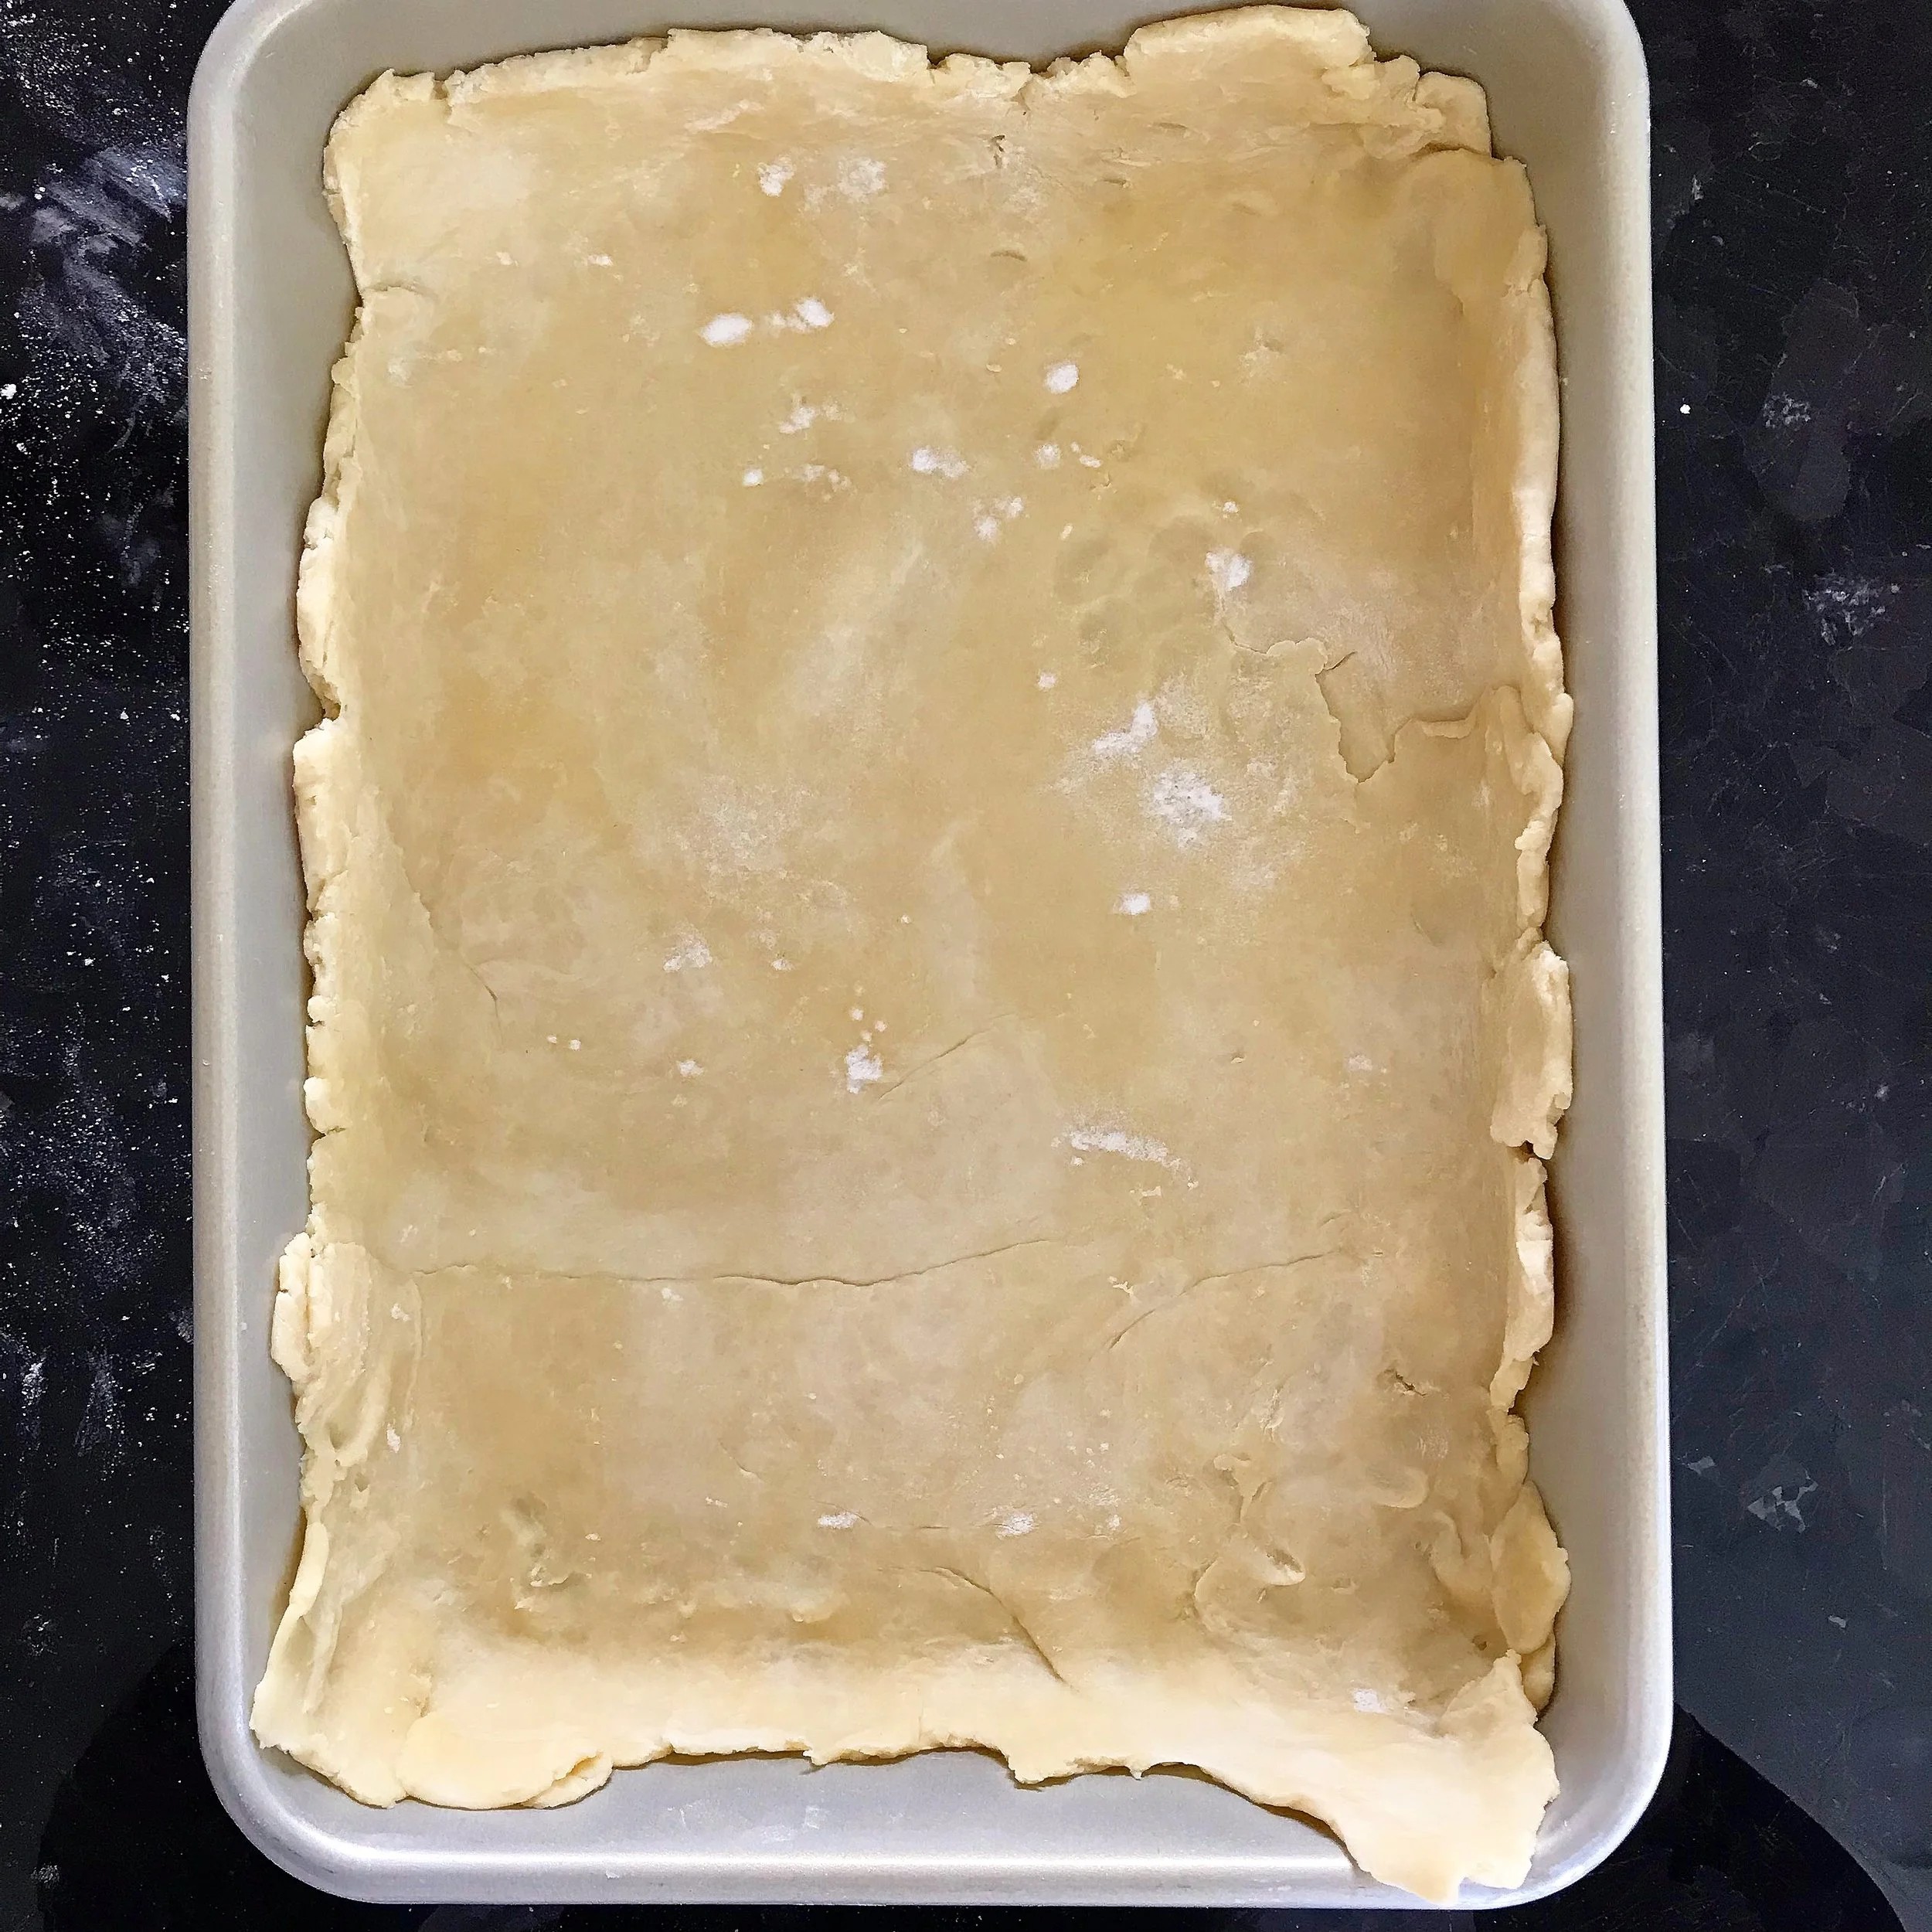
For pie crust: On a well-floured surface, roll out one pie crust to about 11” by 15”. Gently remove from rolling surface and drape into an ungreased 9” x 13” metal pan, making sure that the entire bottom surface of the pan is covered by crust. Re-flour the rolling surface and roll out the second pie crust to about 9” by 13”. Gently remove from rolling surface and drape onto a piece of parchment or wax paper. Place both the prepared pan and the second crust in the refrigerator while you prepare remaining ingredients.
For pie filling: In a large bowl, combine sugar, flour, cinnamon, and salt. Core, peel, and slice apples about 1/4” thick. Place apples into bowl with sugar mixture and sprinkle with bourbon. Using a spoon or your hands, toss together until the sugar mixture and bourbon have become a wet, sand-like mix and apples are coated with it.
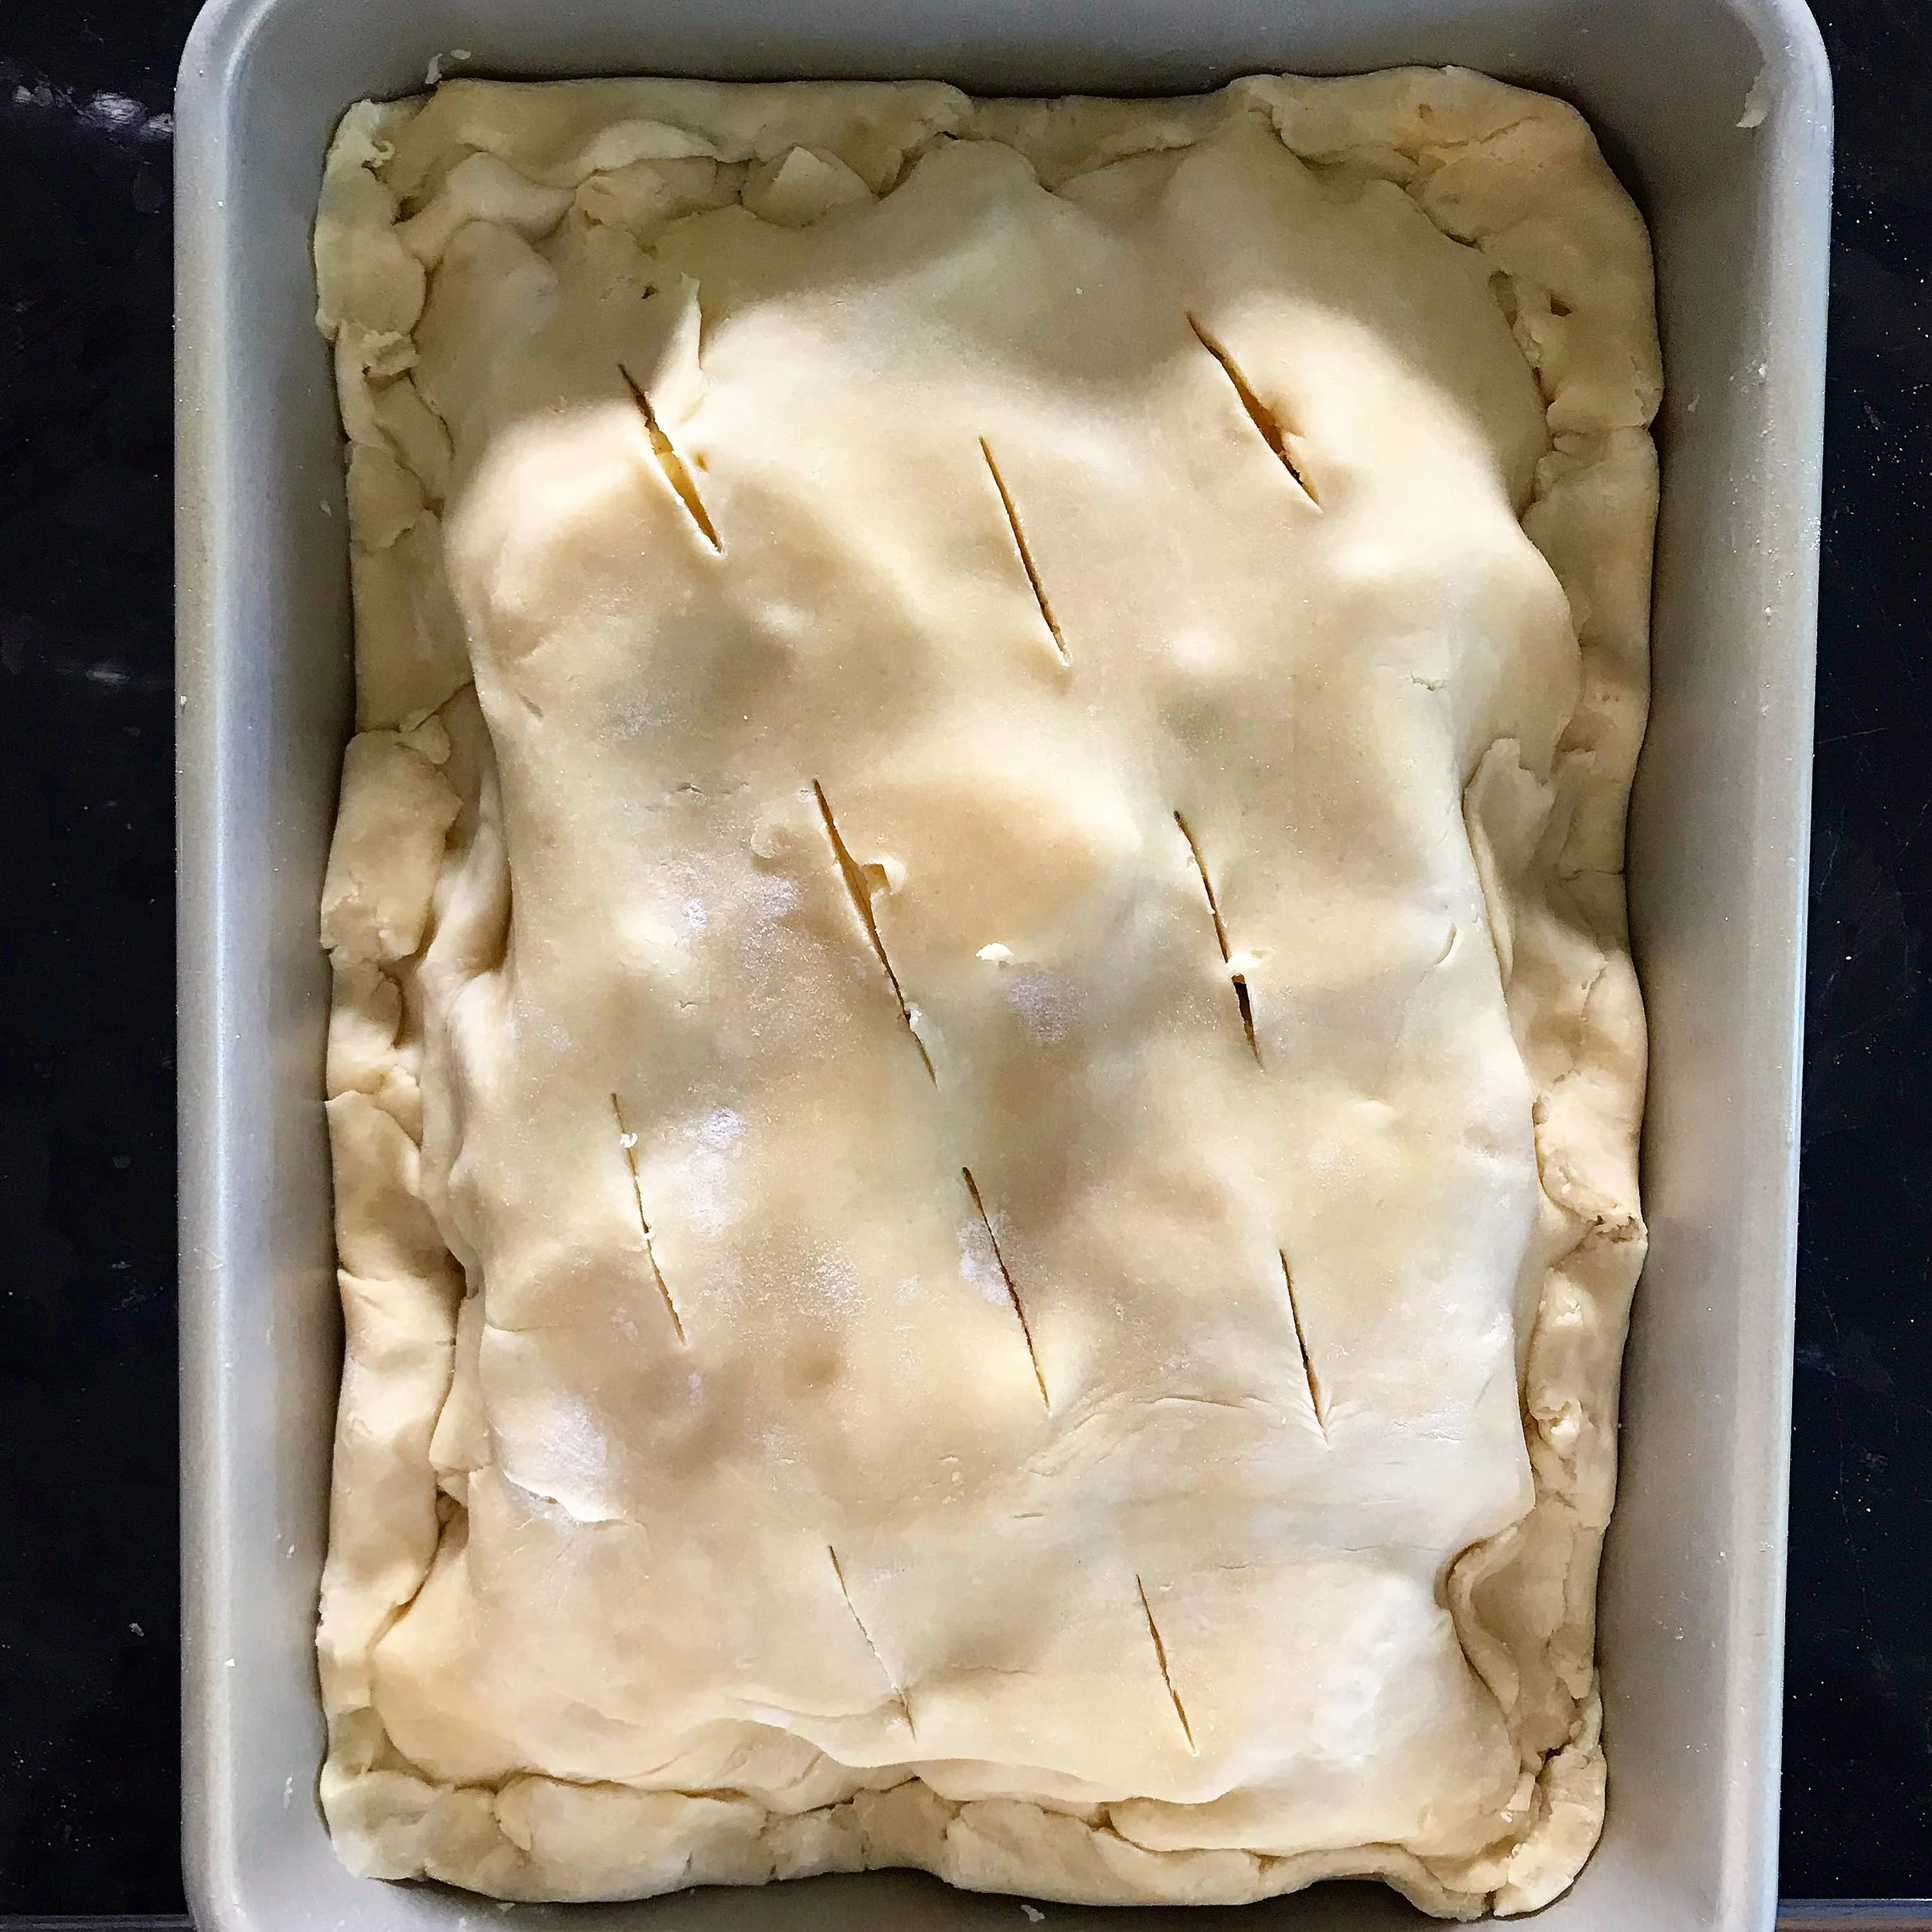
Remove prepared pan from the refrigerator and place on foil-covered baking sheet. Pour apples into crust and distribute evenly. Remove second crust from refrigerator and lay on top of the apples, trying to make sure they are all covered. If there are gaps in the top crust, you can trim any excess crust on the sides and use to patch the gaps; alternatively, embrace the gaps and let them be. Remember, SLAB. Using your fingers, pinch the top and bottom crusts together to seal. Cut several vent holes in the top crust with a sharp knife.
Bake for about 60 minutes or until pie crust is golden brown, the filling bubbles, and juices are thickened and sticky. Remove from oven and allow to cool on a wire rack while you make the glaze.
Meanwhile, for glaze: Place powdered sugar in a medium bowl and set aside. Place butter in a medium, heavy-bottomed saucepan over medium heat. Swirl the pan occasionally as the butter melts, then foams, then begins to bubble vigorously. Once it begins bubbling, swirl more frequently so that you can check the color at the bottom of the pan. You can also drag a spoon through it to check the color. Heat until the butter has a nutty aroma and has turned a medium golden-brown color with darker brown (but not black) flecks. The whole heating process will take about 5 minutes (for step-by-step photos of how to brown butter, check out my Browned Butter Frosting recipe).
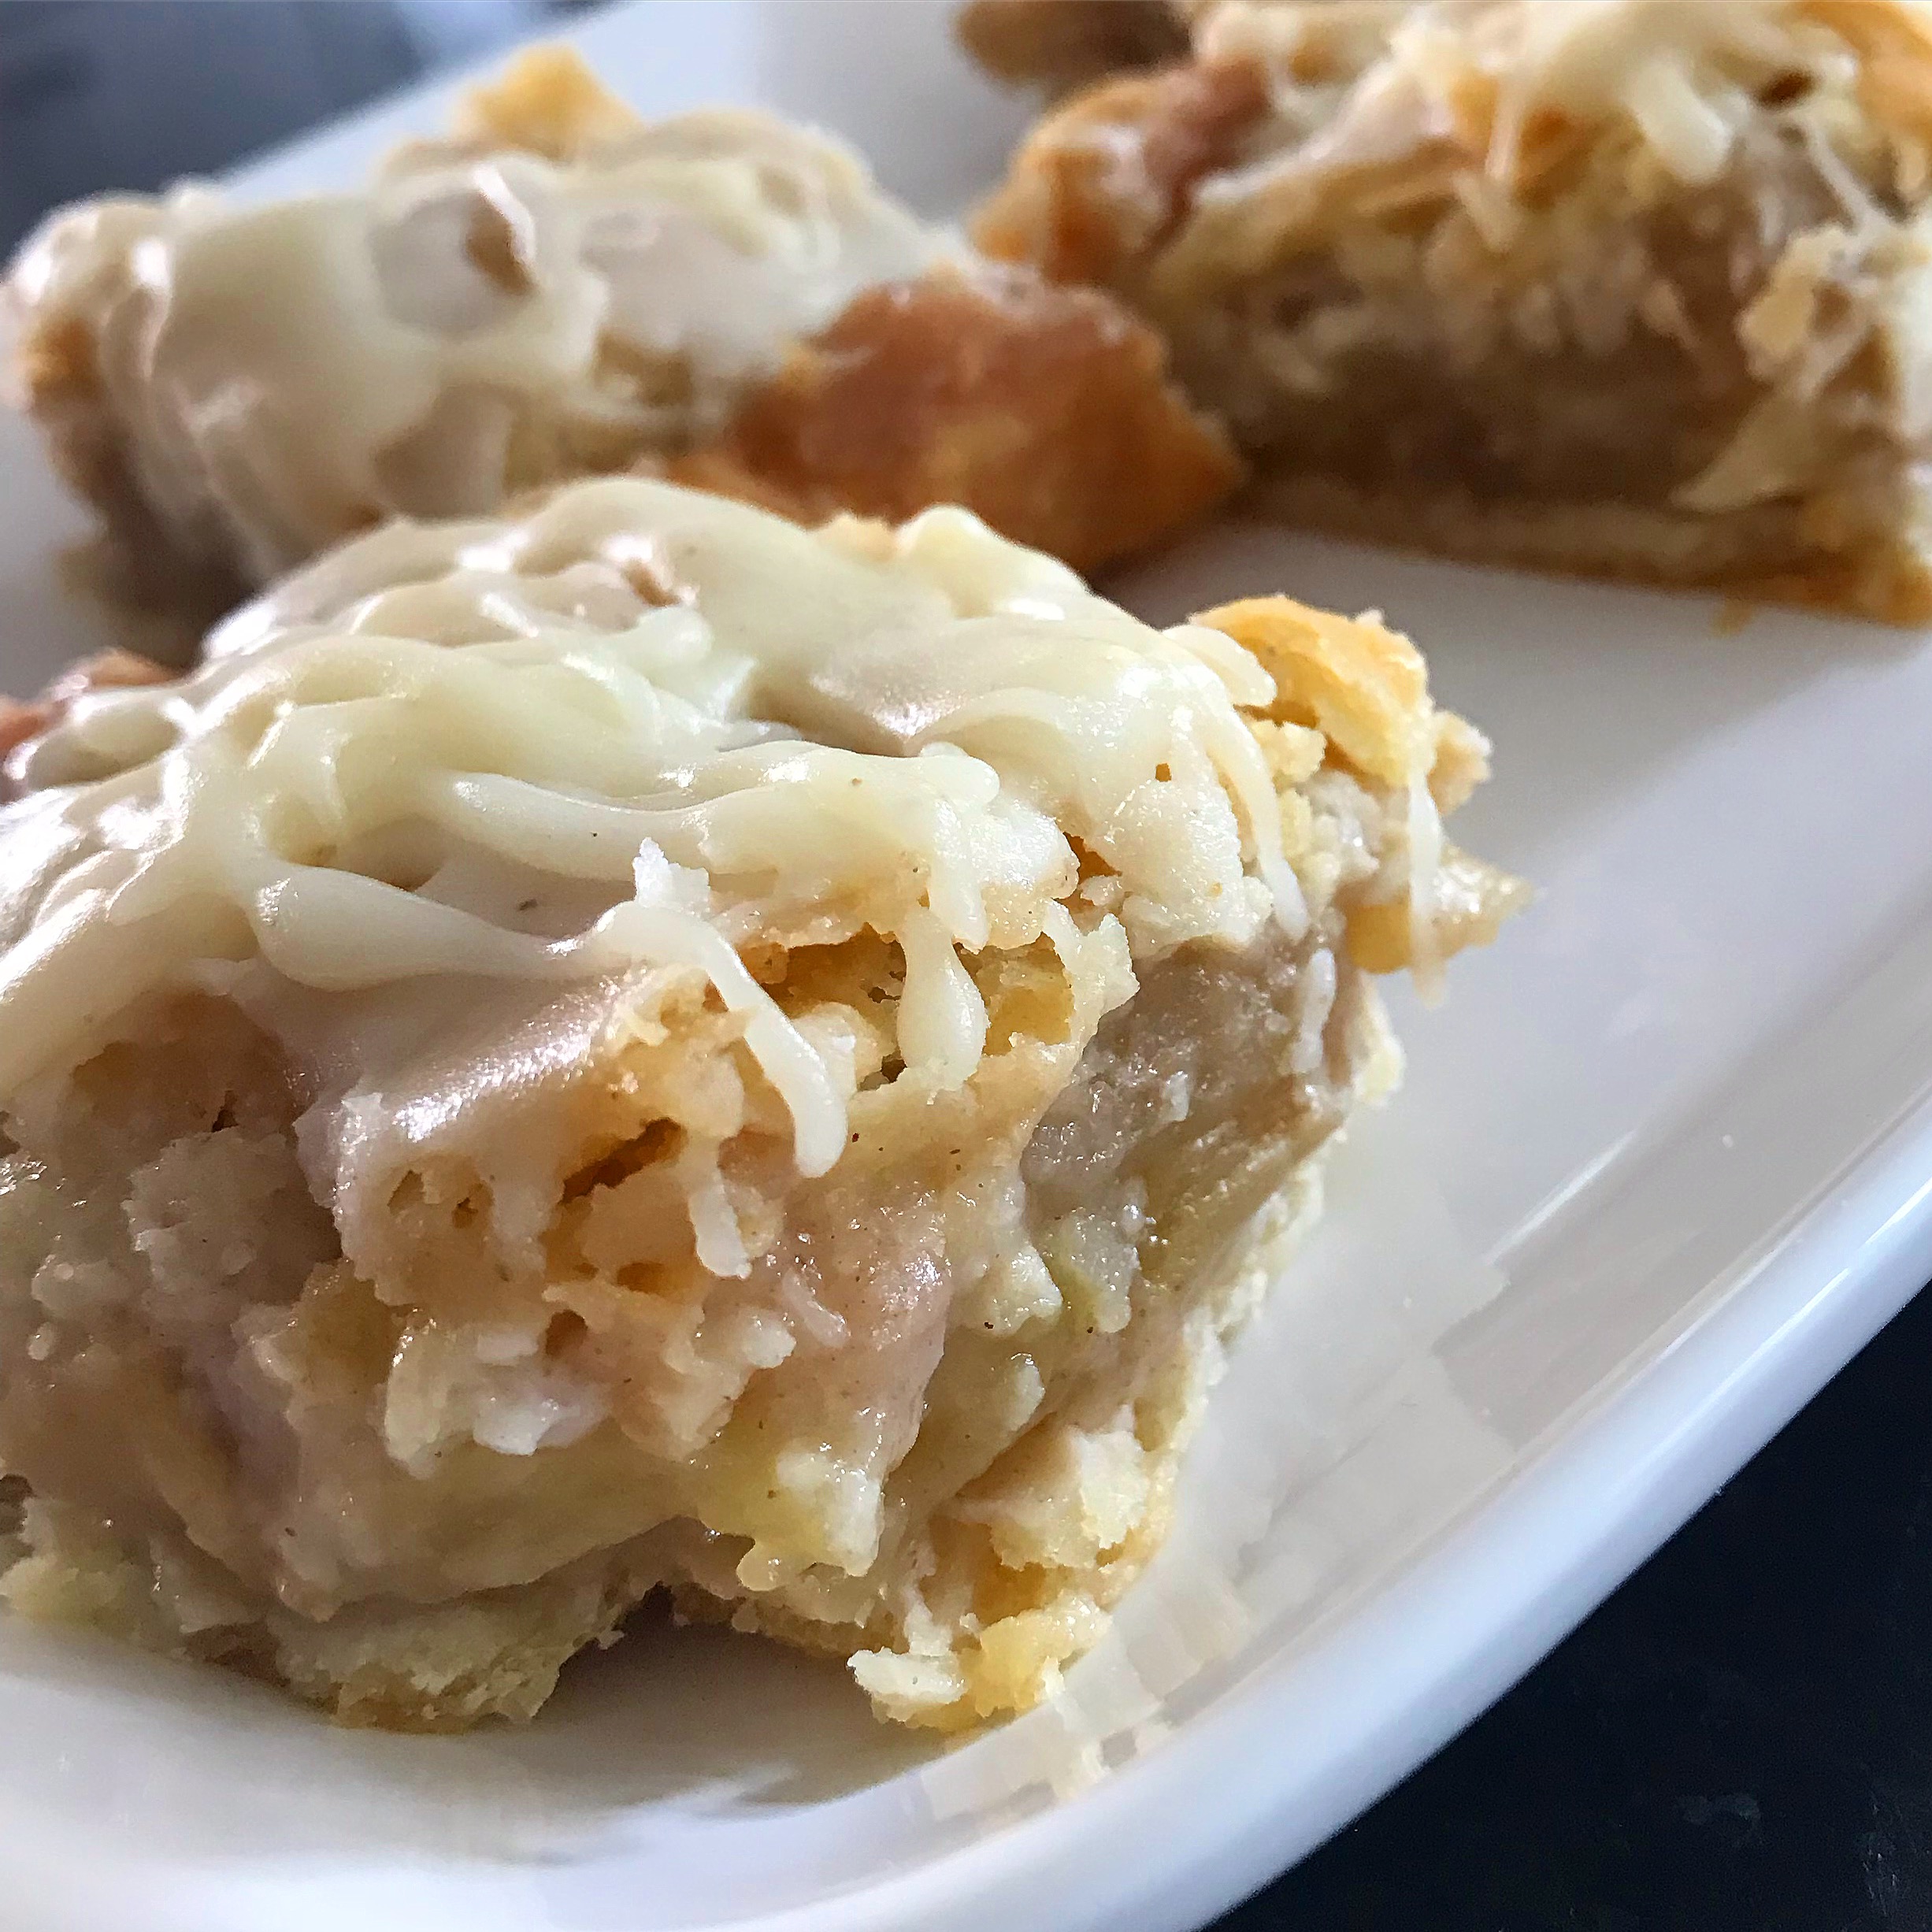
Immediately pour the butter into the powdered sugar, making sure to pour the darker brown flecks in as well. Add water and whisk together vigorously. If the glaze seems to be separating, continue to whisk until it comes together. Immediately drizzle glaze with a spoon onto the surface of the pie, using as much or as little of it as you would like. Allow pie to cool and glaze to set for at least 30 minutes before cutting. Yield: 16 big servings, 20 reasonably sized servings, and even more servings if you’ve got dainty eaters.